Tuesday, February 28, 2012

Quilted Top Note Purse


Well today's post has been sitting here on my desk waiting for me to finish the project and then type up. I have finally gotten to it, after almost a week. Life has been a bit busy lately.


My inspiration for today's project came from a fellow Demonstrator on Stampin' Connection, Michelle Yager. Stampin Connection is a site for demonstrators to share projects, ideas and discuss all things Stampin' Up! I really liked the look of her quilted top notes, so I thought I would give it a try. Here is my finished project.


I used the top note bigz die to create my front and back with card stock & chipboard. Two pieces of card stock and one piece of chipboard for each. on the two of the four pieces of card stock. To create the quilt I used my 1-1/4" square punch to punch out my designers series paper and then glued to a scrap piece of card stock. I then ran it through the big shot with my top note die and then trimmed around the edge at the scored line, this then allowed me to glue this piece as an insert on my front piece of Lucky Limeade card stock. I then repeated this step for the back of my purse. I added a box that I sized to the top note and made out of matching CS, I added the ribbon to the sides and then attached a brad to each side to cover up my ribbon holes.

Decorate the front how ever you wish and add some chocolate or pens & pencils and you have a cute little purse to give as a gift.

I hope you all enjoy!
DanicaA

Project Recipe: Lucky Limeade & Whisper White Card Stock, (SAB) Everyday Enchantment Designers Series Paper, Oval All Stamp Set, Basic Black Ink, Big Shot, Top Note & Beautiful Butterflies Bigz Dies,Lots of Tags Sizzlits Die, 1-1/4Square & Extra Large Oval Punch, (SAB) Calypso Coral Organdy Ribbon & Everyday Enchantment Brads

Wednesday, February 22, 2012

3x3 Note Card Purse


 Today's project is a cute little card purse, I made following the directions I found on Sandi's blog Another Chance. I had fun making this purse and think that they would make great gifts or even a craft fair item as you can create coordinating 3x3 mini cards to include along with envelopes. I changed my version of this purse a little bit. I was trying to use the dazzle glitter for the butterflies's bodies and when I set the purse down with out really thinking through what I was doing the dazzles dripped and I ended up having to come up with a new idea for the body. I used the word window punch and cut the punches down for the smaller butterflies. I don't think they turned out to well, but I tend to be picky in things like that when it comes to my own work.

My cards were made with coordinating card stock & designer series paper. I decided to keep them simple as I do want them to be able to fit inside the purse along with envelopes. 


I hope you all enjoy!
DanicaA

Product Recipe: Rose Red , Pumpkin Pie & Very Vanilla Card Stock, Sweet & Sour Designer Series Paper, Big Shot, Beautiful Butterflies Bigz Die, Four Frames, Petite Pairs & I{Heart} Heart Stamp Sets, Basic Black & Rose Red Stamp Pads, Curly Label, Heart & Decorative Label Punch, Rose Red 1/4" Grosgrain Ribbon, Glimmer Brads, Basic Pearls & Basic Rhinestones

Tuesday, February 21, 2012

Happy Birthday Butterflies


Today's post is a card that I made for a challenge and didn't have finished in time. It is good practice though. I was unsure if I liked how it turned out as the card is a bit busy. I find that I like the more I see of it.


To view other cards that were entered into the challenge visit Color Throwdown


Don't forget to visit my online Stampin' Up! Store before March 31 to take advantage of the Sale-A-Bration specials. 


I hope you all enjoy!
DanicaA

Product Recipe: Crumb Cake, Poppy Parade & Blushing Bride Card Stock, Everyday Enchantment Designer Series Paper, Big Shot, Beautiful Butterflies Bigz Dies, Elegant Lines Textures Impressions Folder, Curly Label Punch, Elementary Elegance Stamp Set,  Poppy Parade & Basic Black Ink Pads, Basic Pearls

Monday, February 20, 2012

Treat Box


Today's Project is a treat box I made using the directions from Got Rubber...Will Stamp by Wendy Hawkinson. Hers is a cupcake box, but I think you could probably use it for just about any kind of treat. 

My colors came from the  


I started with a Whisper White piece of card stock and used the three tea cup stamp from the Tea Shoppe Stamp set. I used my my markers in Melon Mambo, Wisteria Wonder & Pretty in Pink to ink my stamp image, each cup one at a time, changing color or cup, stamping randomly over the paper. Stamping only on the side that would be my outside when my box was finished.


To cut out the piece in the top for my window sheets I used the Label Collection Framelits, the second to smallest sized, placed at an angle. I then used the same label framelit and the smallest to create my tag. I attached the tag to my Melon Mambo Polka dot ribbon with Wisteria Wonder bakers twine. I also used the Scallop Trim Border Punch for my borders around the edges of my box lid.

I hope you all enjoy!
DanicaA

Project Recipe: Whisper White, Wisteria Wonder, Melon Mambo, Pretty in Pink Card Stock, Labels Collection Framelits, Tea Shoppe Stamp Set, Melon Mambo, Wisteria Wonder, Pretty in Pink Stampin' Write Markers, Melon Mambo Polka Dot Ribbon, Wisteria Wonder Bakers Twine

Sunday, February 19, 2012

Masculine Birthday Card


I created this card at my father's request for a co-workers boyfriends birthday. I had made all our Holiday cards and when she received hers she liked it so much that she still has it sitting out on her shelf. So my dad told her he would see if I had one he could give to her. I haven't made to many masculine cards and so had to come up with something that was masculine and hopefully she will like this card. 


I started out by choosing my designer series paper I had a choice between the Well Worn Series or the Mocha Morning. I decided the Well worn would work best, I then picked out my background card stock of Not Quite Navy & Cajun Craze. After which I began to play with the layout & then went on to add the punch shapes with silver brads as studs and then my sayings. I think this card would also work well for a cowboy theme. 


On the inside I decided that I wanted to continue the well worn feel so, my saying was stamped with the image not quite completely covered in ink.  I then took my Tea Stain & Navy Distressing essintials ink pads and just swiped them across the Very Vanilla Card Stock and around the edges, going in different directions and not covering the paper completely. I did the same to my envelope and added a piece of Well Worn DSP as an envelope liner to have a coordinating envelope.

I hope you all enjoy!
DanicaA


Project Recipe: Cajun Craze, Not Quite Navy & Very Vanilla CS, Well Worn DSP, Decorative Label & Word Window Punch, Silver Brads, Tea Stain & Navy Distressing Ink Spots, Outlined Occasions & Happiest Birthday Wishes (Hostess) Stamp Sets, Not Quite Navy Classic Ink Pad, Very Vanilla Envelope

Saturday, February 18, 2012

Mocha Morning Mini's


These cute little mini's were made mostly during my lunch breaks at work. Boy, did my lunch fly while I was busy having fun. I used the Mocha Morning Designer Series Papers and added some color by using Poppy Parade, Pool Party & Island Indigo Card stock and ink pads to give the cards some pop. I like how they turned out. You can tell that I definitely liked the flowers as I kept with that design for the most part.

I am hoping that Stampin' Up! will keep the Tea Shoppe Stamp Set and maybe make some punches for the tea cups. Wouldn't that be gorgeous, I hand cut out the little tea cups but you have to be extremely careful at the handles as the break quite easily. Punches would make that problem non-existent.

Let me know which one is your favorite.
I hope you all enjoy!
DanicaA

Project Recipe: Basic Black, Poppy Parade, Pool Party, Island Indigo & Very Vanilla CS, Mocha Morning DSP, Blossom & Fancy Flower Punch, Labels Framelits, Antique & Basics Glitter Brads, Petite Pairs & Tea Shoppe Stamp Sets, Basic Black, Poppy Parade, Pool Party, & Island Indigo Classic Ink Pads, Espresso Quilted Satin Ribbon

Friday, February 17, 2012

Birthday

Well today is my birthday and I can see the end of the tunnel, that my twenties just around the corner. I think that when birthday's roll around we should only change ages about every two to four years or maybe only when we actually feel like we have aged. 

Life is good though, so I can't complain. I have been very busy lately and my life is going to get busier here really soon. I will be working a lot more, and things will be steadier. At least that is what I hope for, I feel like I am working a ton know but I think it is because I spend so much time going here there and everywhere, and that is just work related trips. 

I am going to have a project finished and hopefully photographed and posted for you today but if not tomorrow night for sure. This weekend is another craft camp so I will need to get my stuff packed. I still need to get a few items. I am hoping to showcase the sweet pressed cookie stamps, using store bought product rather than homemade cookie dough and frosting. I will take photos of those also and let you know how they turn out. When my life is less hectic I will get out my favorite cookie recipe for pressing and give them a whirl with the cookie stamps. The recipe I have makes about five dozen, so they take a long time to roll, cut and cook.

I hope you all enjoy!
DanicaA

Tuesday, February 14, 2012

Happy Birthday Framelit Card


Today's card was made using Stampin' Up!'s new Labels Framelit die set. I started out using the largest label and a piece of Poppy Parade card stock about 10" x 5-3/4".  I used the next sized label framelit and the Sale-A-Bration Designer Series Paper Everyday Enchantment to create my layer. I add texture by running the paper through my big shot using the square lattice embossing folder, after I had trimmed it down to size using the framelit and then my scissors to cut the edge off so the top aligns.

I created the flower by using the Blossom & Fancy Flower Punches, I punched a variety of flowers using coordinating CS and some of the DSP. I then ran that through the Big Shot again using the square lattice embossing folder. I crumpled the paper up really well, aligned them the way I wanted them to look and pierced using my paper piercing tool. You definitely want to use the mat pack to protect your fingers when piercing. I attached a brad and attached to the card. I used the curly label punch to create a spot for my greeting, using the Happy Birthday from the Sale-A-Bration set Elementary Elegance. I sponged around the little label using Basic Black ink. 

For the inside I added a layer of Very Vanilla Card Stock also cut as the layer on the front of the card. You can an additional birthday wish here and you could also sponge the edges for added dimension.

Well, that is all for today.
I hope you all enjoy!
DanicaA


Project Recipe: Poppy Parade, Pool Party, Calypso Coral & Very Vanilla Card Stock, Everyday Enchantment Designer Series Paper, Elementary Elegance Stamp Set, Basic Black Classic Stamp Pad, Big Shot, Labels Framelits, Square Lattice Embossing Folder, Curly Label, Blossom & Fancy Flower Punches, Everyday Enchantment Brad

Sunday, February 12, 2012

Chocolate Chip Oatmeal Bars


1/4 c  Earth Balance Soy Garden * 
1/2 c applesauce

1/2 c. white sugar

1-1/4 c. brown sugar

4 T Soymilk or water
2 T Soymilk

1-3/4 c. all-purpose flour

1 t  baking soda

2-1/2 c. oatmeal
1 to 1-1/2 c chocolate chips
1 T vanilla
1/2 - 1 c. chopped nuts (optional)

Cream butter, add sugar, cream together. Add eggs, hot water, mix together. Add flour, soda, salt. Add oatmeal, chocolate chips, vanilla and nuts slowly. Mix well.
Spread in a greased 9x11 inch pan. Bake 375°F 25-30 minutes.


*These items can also be purchased at your local health food stores.


I hope you all enjoy!
DanicaA


Friday, February 10, 2012

Butterfly Top Note Box 2


Here is another Box I made again using Retired papers, but I love how it turned out. This is also my entry is this weeks Stampin' Royalty Picture Inspiration challenge. What a gorgeous setting.


Here is the link to the tutorial I used to create this box. 


Today's post is a bit short but, I hope you all enjoy, anyway!
DanicaA

Project Details: Project Recipe: Melon Mambo, Very Vanilla, Glossy White Card Stock, Sweet & Sour Specialty Designer Series Paper, Vellum, Four Frames, Petite Pairs & You Are Loved Stamp Sets, Melon Mambo & Regal Rose Classic Stamp Pad, Melon Mambo Embossing Powder, Embossing Heat Tool, Frost White Shimmer Paint, Top Note Bigz Die, Beautiful Butterflies Bigz Die, Big Shot, Sticky Strip, Victoria Crochet Trim, Pearls

Thursday, February 9, 2012

Butterfly Top Note Box


I saw this box on another blog with tutorial attached and decided I wanted to give it a try. I really liked how it turned out. The Butterfly Stamped image didn't come through in the picture as well as I would have wished, but it is very pretty and quite subtle. the image isn't the least bit over powering. I used retired Stampin' Up! DSP as I wanted to try the project out and felt if I messed up at least it wouldn't be with my current papers.

I am including multiple photos of the finished product, in one of which I included some Hershey's Hugs. The boxes are perfectly sized for small candies or little trinkets and would make a great valentine gift.


Here is the link to the tutorial I used to create this box. 

I hope you all enjoy!
DanicaA


Project Recipe: Baja Breeze, Very Vanilla, Glossy White Card Stock, Elegant Soiree Designer Series Paper, Vellum, Four Frames, Petite Pairs & SAB Fresh Vintage Stamp Sets, Crumb Cake Classic Stamp Pad, Crumb Cake, Marina Mist, Bashful Blue, Baja Breeze, Basic Grey, Soft Suede Stampin' Write Markers, Frost White Shimmer Paint, Top Note Bigz Die, Beautiful Butterflies Bigz Die, Big Shot, Sticky Strip, Victoria Crochet Trim, Pearls


Wednesday, February 8, 2012

Photo Updates for Past Posts


Here is the promised photo of my new shelf unit

I have finally taken some photos of the Olive Salsa. I provided this recipe a while and was wishing that I had a photo or two of them.


I hope you all enjoy!
DanicaA

Tuesday, February 7, 2012

Shopping & Blogger Background

Today was a hectic day, I spent the day in town, which means an hour drive each way, Shopping & visiting family. A couple of my siblings are going to the community college working on their prerequisites and my grandparents live near by, so went to visit them as grandpa just got out of the hospital today. He had a relapse of Pneumonia, He is doing better though.
Isn't this gorgeous!


More Craft Storage 

So in between visiting I did some shopping therapy, bought a shelf for the wall behind my bedroom/craft/office door for storage for my crafting supplies. I think it will work perfectly and if it does I may have to buy another. I will add photos when I get this put together and hung up.
& it's portable.....WooHoo!


I also did a bit more work on my blog background, I have finally figured out how to get it on my blog now I have to figure out how to get it positioned the exact way I want. It keeps cutting of the parts I wish to keep or making things to short. I think I know what I need to do but it will take a bit of time.


I hope you all enjoy!
DanicaA

Sunday, February 5, 2012

New Header made with MDS

Today I have been working on creating a new header using Stampin' Up!'s digital program My Digital Studio. To find out about the 30 day free trial visit my February 1st post. 


I really like the design but I definitely need to work on re-sizing it as it is way to long.
Tell what you think of it. I would really like some feed back as to whether it all works well together.

I have also been working on a new background to coordinate with the header, I think I will have it made by tomorrow and then I have to figure out how to get it on here properly.


Well, really short today....
Hope you all enjoy!
DanicaA

Saturday, February 4, 2012

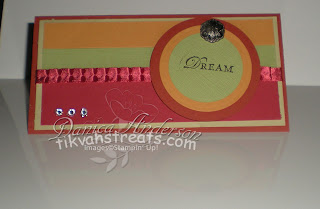
Dream Card


Tonight, I made this card using the colors from 


I like the colors and the shape, although I am not sure that it turned out quite the way I wanted it to. I may have to try this again at a future date.


I hope you all enjoy!
DanicaA

Project Details: Cajun Craze, Riding Hood Red, More Mustard, River Rock, & Pear Pizzazz Card Stock,  Loving Thoughts Stamp Set, Basic Black Classic Stamp Pad, Basic Rhinestones, Riding Hood Red Pleated Satin Ribbon, Circle Dies, Big Shot

Friday, February 3, 2012

New Catalog Schedule

This past month Stampin' Up! announced some changes to the catalog, both the Idea Book & Catalog & the Mini Catalogs.  Some of these changes may have you thinking Oh, No! What are they doing? But I ask that you hold on to all thoughts and wait to see how this works out. I am listing below some of the changes and my thoughts and opinions on them.


  • The Idea Book & Catalog will be renamed to The Annual Catalog
    • This raises many questions, by changing the name will they get rid of the samples pictured in the book? According to the information I am receiving as a Demonstrator is that the samples will stay.
  • The annual catalog will run from June 1, 2012 (preorder in May) through May 31, 2013
    •  This means that your current catalog will be ending a month earlier so be prepares to purchase those things you really want as they may be retired a month sooner than expected.
  • The annual catalog will be reduced from over 240 pages in the current Idea Book & Catalog to 208 pages.
    • Okay I will admit that this raise more than a few eyebrows, but at the same time as announcing the catalog will have less pages they also made a few other announcements that makes this less scary & less likely to mean a huge difference in the amount of products available. 
      • One of the things mentioned was that the Simply Adorned & Decor Elements will be discontinued together this cuts out 8 pages
      • Also announced is that most seasonal items will be moved to the Seasonal Catalogs (see more below regarding minis). By removing these items or even just most of them they free up 30 pages
      • Total the amount of pages they are reducing the catalog (32 Pages) by and the total of pages that simply adorned, decor elements & seasonal items take up 8+30=38. This is a total of 6 pages more than they say they are reducing the catalog by. This to me means that they won't be removing all the holiday items from the main catalog.
      • Stamps will still be featured at full size.
  • The annual catalog will be printed on lighter-weight paper.
    • Okay I am unsure what this will mean to the quality of the catalog, we are all questioning whether this will cause the catty's to fall apart sooner or become even more dog-eared. I am going to have to wait for the answers to questions I have to this change.
  • Celebrando Creatividad will remain unchanged.
  • The Occasions, Summer, and Holiday Mini Catalogs will be replaced by two seasonal catalogs called the Holiday Catalog and the Spring Catalog.
    • Okay I am excited about this change. As things stand right now, I feel we barely have a chance to show case items in the minis especially the summer mini before it is time to introduce a new mini. I also feel this will give us more opportunity to show off more of the annual catalogs products.
  • The first Holiday Catalog will run from August 1, 2012 through the beginning of January, 2013
  • The first Spring Catalog will run from the beginning of January, 2013 through May 31, 2013.
    • Longer running time= more chance to decide if you like a product and a better chance of being able to afford the items you want.
  • The seasonal catalogs will be larger in both size (8 1/2" x 11") and page count (about 40 pages) than the current mini catalogs.
    • This is great. I am not sure how much this will change the amount of product these will carry, if they will have more new items or if the size/page amt will just be for the additional seasonal items they choose to bring back each year.

Whew, long post today, but I felt that you need to know what changes will be occurring with Stampin' Up! in the near future. Many of the changes I am excited about, the main change that I am hoping to here more about soon is the new cost of the annual catalog. We know the cost is changing for us but I would like to know what the change of cost to you will be. 

Keep watching for updates on these exciting new changes to Stampin' Up!

I hope you all enjoy!
DanicaA

Thursday, February 2, 2012

Wonderful You Heart


Today's post is a gorgeaous card I made using the Color Throwdown #177 challenge. 


I really wanted to try this with my new heart framelits but just hadn't gotten around to it, so I decided that last night was the night I was going to make my heart card. It is so simple, take a piece of card stock 11" X 5-1/2" fold in half and place your largest heart die just slightly off the edge at the fold and run through your big shot. I like being able to make different card shapes. 


Aren't these gorgeous colors. Very Classy.
Before I started Blogging and selling Stampin' Up! products, I made a card for my grandma's birthday, she loves butterflies and I had a stamp of a large butterfly. I traced the butterfly on card stock folded in half with the top of the wings at the folded edge, cut around my tracing and had a wonderful personalized card for her. I know the ladies at the post office really liked it.

I hope you all enjoy!
DanicaA

Project Recipe: Melon Mambo, Basic Black, Whisper White Card Stock, Hearts Collection Framelits, Big Shot, Heart Punch, Vanilla Scented Embossing Powder, Take It To Heart Stamp Set, Melon Mambo Classic Stamp Pad, Whisper White Organza Ribbon, Basic Pearls, Dimensionals

Wednesday, February 1, 2012

My Digital Studio

free 30 day trial download is available today! 
Visit my website to download and try out My Digital Studio. If after thirty days you choose to purchase you, you can purchase the downloadable or disc version of the software to continue using it. You'll simply open up the trial version you already have on your computer, and will be prompted to enter the product registration key you received after purchasing the software. (You'll receive this key via e-mail if you purchase the downloadable version, and you'll find it along with your shipped software if you purchase the disc version.)

So come on over and give it a try.
I hope you enjoy!
DanicaA