Monday, January 9, 2012

Double Heart Card


This card was made using items that I had been experimenting with and leftovers. The Back die cut is the leftover paper after using the Paper Doily Sizzlits Die. The hearts were made using the Framelits heart collection two different sizes and the Paper Doily Die. I cut out the Paper Doily first on my Big Shot and then place both my doily and my solid card stock in Big Shot with my Heart Framelit after which I glued the heart doily & solid heart together. 


On the smaller doily I used Crystal Effects to cover, this changed the colors slightly and made the heart nice and glossy. I used the 5/8" organza ribbon and the 1/4" grosgrain ribbon gluing the 1/4" to the center of the organza ribbon and then gluing to my cut-out. I then glued the cut out to the card and glued the hearts in the center to create a simple but lovely valentine. 

I hope you all enjoy!
DanicaA


Project Recipe: Whisper White & Real Red Card Stock, Patterns Designer Series Paper Stack Brights Collection-Real Red, Big Shot, Paper Doily Large Sizzlits Die, Framelits Heart Collection, 5/8" Whisper White Organza Ribbon, 1/4" Real Red Grosgrain Ribbon, Crystal Effects

Sunday, January 8, 2012

Bigshot Club & New Website

Today I have been working on putting together a big shot club, I haven't quite finished the flyers but once I do I will upload them for you all. 

I have also spent hours today trying to get a permanent website up, with a new blog and other links. I am not having much success. I either am doing something wrong, missing something or the site software is not as easy as they say.....hmmm. We will see.

I hope you all had a great day & I will try to make sure I have a project for tomorrow.
DanicaA

Saturday, January 7, 2012

Patchwork Heart Card

Twitterpated Designer Series Paper, a Square of Card Stock & the New Stampin' Up! Framelits Heart Collection are used to create this lovely Patchwork Heart Card.

I started by cutting a Square piece of CS slightly larger than the largest Framelit heart, I then cut my DSP to varying width & lengths and glued to the CS (although if you cut them all the same length  as your square and then angle your heart die you will have the same effect without as much waste and this will make it easier. Oh! Boy, I should have thought of that sooner!) I then used the Framelits Heart with the Scallop edge to cut my heart with the Bigshot. I cut four pieces of DSP into triangles and glued them together onto another square of CS. I wrapped the Real Red Pleated Satin Ribbon around the edges gluing with the sticky strip as I wanted the ribbon to stay put. I then glued the patchwork heart to the front and used a smaller framelits heart  to cut another heart which I sprayed with Blushing Bride Smooch Spritz Stamped with the forever & Always stamp from the Loving thoughts stamp set and embossed with vanilla embossing powder. I then used a glimmer brad to accent and attached with a dimensional.

I like the results although I do feel that it could be a little less busy. I will probably make another one trying out the method above for my strips and instead of wrapping the ribbon around the whole card just I will try it just around the heart itself. We will see what results I get.

Hope you all enjoy!
DanicaA

Project Recipe: Whisper White Card Stock, Twitterpated Designer Series Paper, Loving Thoughts Stamp Set Basic Black Classic Ink, Framelits Heart Collection, Bigshot, Real Red Pleated Satin Ribbon, Blushing Bride Smooch Spritz, Vanilla Scented Embossing Powder, Heat Gun, Glimmer Brad

Friday, January 6, 2012

2011 Holiday Card

This year was the first year I made our Holiday cards.

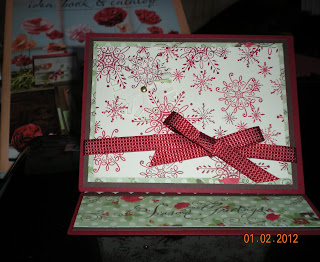
For our Holiday card this year I went with an easel card. My mom loves this style...she doesn't like the way that most traditional cards fall over when you stand them up. This card stands up on its own a lot better than most.


Again I am using my favorite stamp set Serene Snowflakes. I stamped a full size sheet and cut down to size, by using a 12X12 piece of cardstock I was able to get 6 front pieces out of each piece of CS & 4 out of an 8 1/2X11 sheet. I also used the many Merry messages stamp set for my Season's Greetings & inside stamped message. I varied the inside message using different stamps from the same set.


I made about 40+ of these cards and so I wasn't feeling like I was an assembly line worker I varied things a bit. By using a single pack of DSP I was able to have a about 4-5 options paper wise. I kept the cardstock the same through out and varied the snowflake placement, Sometimes on the left hand as seen above and sometimes on the right with the ribbon on the left side tied in a knot instead of a bow. Also by flipping the punched out snowflake over I was able to use the Simple Snowflake matching stamp to have a different look. I also changed the brad on some to Rhinestones.


This year holiday cards are going to be much easier to make. Although the Simply Scored Tool came in handy with all the folds on this card.


I hope you all enjoy!
DanicaA

Serene Snowflakes - by Stampin' Up!
Serene Snowflakes 115438

Many Merry Messages Stamp Set - by Stampin' Up!
Many Merry Messages 116586


Project Recipe: Cherry Cobbler, Chocolate Chip & Very Vanilla CS, Holly Berry Bouquet DSP, Serene Snowflakes & Many Merry Messages Stamp Sets, Scallop Edge Border Punch, Snowflake Punch, Real Red, Cherry Cobbler & Basic Black Classic Ink Pads, Simply Scored Scoring Tool, Cherry Cobbler 3/8" Quilted Satin Ribbon, Gold Brads or Basic Rhinestones

Thursday, January 5, 2012

Cindy's November Craft Camp Project 3

To & From Stockings with Pocket


These were a favorite of the class. Not a lot of stamping is done with this project, but you can definitely  have fun fancying them up.

I used Designer Series Paper & Cardstock to give them weight as the DSP alone makes them a bit flimsy. The Baker's Twine gives a nice touch and although you can't see it very well in most of the pictures in the one below to the right top you can see a little of the quilted ribbon folded in half that we glued at the edge between the CS & DSP to give the finish touch to our stocking.
By adding a piece of cardstock to the back, glued just at the edges you have a pocket that you can place a gift card in and give as a gift.


I hope you all enjoy.
DanicaA

Project Recipe: Frostwood Lodge DSP, Cherry Cobbler & Garden Green Cardstock, Early Espresso 3/8" Quilted Satin Ribbon, Early Espresso Baker's Twine, Dear Santa Stamp Set, Holiday Stocking Bigz L Die, Snow Burst Textured Impressions Embossing Folders, Bigshot, Basic Black Classic Ink Pad, Scallop Edge Border Punch


Wednesday, January 4, 2012

New Stampin' Up! Mini Catalog

The New Mini is now available to order from....Yippee!!! 
What a Gorgeous Catalog, I love the Green.
There are some great items in this catalog. I really like the Paper Doily Sizzlits on page 7 and the Framelits on page 6. The Fashionable Hearts Embosslits Die on page 35 is very cute. The new colors in Bakers Twine (page 35) are great, I love Island Indigo & Pool Party they are two of my favorite Stampin' Up! colors. New Dazzling Details (Cherry Cobbler) & Smooch Spritz Color (Blushing Bride) page 9. I haven't purchased the Edgelits dies but they look like they have some great possibilities. There are some very cute stamp sets although I am unsure about the Gnome Sweet Gnome on page 41, I received this set free for participating in Decembers Book-a-thon, I don't think I would have purchased them otherwise....We will see. There are a few more designs to the Sweet Pressed Cookie Stamps, which means that I am going to be purchasing them soon. Pleated Satin Ribbon to coordinate with the Twitterpated DSP, Oh my, Very pretty! Scented Clear Embossing Powder (page35) in three scents Vanilla, Cherry, & Melon. I purchased the vanilla and it definitely smells like vanilla, now we will be able to use more of our senses when giving or receiving cards.

I have to say when I first saw the Paper Doily I new it had to be in my pre-order. I was excited to open my box, when it arrived on the UPS truck, just before Christmas weekend. As my family was going out of town I had very little time to play with anything I had received, but I took a few minutes for the doily die and I have to tell you that first couple of tries I was feeling a bit disappointed as it just was not cutting through all the little spots like it should have. So I logged on to Stampin' Connection and did a little searching and found I wasn't the only one having problems. Between it not cutting all the way through and the pieces sticking between the little cuts on the die I was very frustrated. 

Well I tried one suggestion, place packing tape evenly on die to cover and this stops the pieces from sticking and can help give more thickness to  help the die cut through. It worked to stop the sticking but the die still wasn't cutting thru, which was more bothersome to me than the sticking, because I was ripping the doily trying to get the few pieces out that weren't cut all the way through. I solved this problem by taking a square piece of the cardboard paper that comes with the DSP to keep it from bending (and tell you what it is) and using tab 2, two standard cutting mats, the square cardboard, the die and my DSP or CS I was able to get the die to cut through perfectly every time!!!!!!

I hope you all enjoy.
DanicaA

Tuesday, January 3, 2012

Last Day to Order From Holiday Mini Catalog


Well, it is the last day you can order from the holiday mini catalog. We do have a few items carrying over but the stocking punch is not included. So if you have anything on your wish list that you haven't purchased be sure to order today. 
I got my last order in last month, although I was hoping the quilted satin ribbon would carry over. They did carry over the Dazzling Details & Glimmer paper which I was hoping for although I had purchased those items also just in case. 

Hurry and place an order for those items you just have to have. You can Purchase by clicking this link Tikvah's Treats by DanicaA


Desserts for All Occasions - Almond Orange Streusel Cake

Almond Orange Streusel Cake
Cake made in Spring Form Pan as a single layer

Streusel
1 c firmly packed Brown Sugar
1 c sliced or slivered Almonds
1/4 c All-Purpose Flour
3 T Earth Balance Soy Garden*
1 T Orange or Lemon Zest

Cake
1/2 c Earth Balance Soy Garden
1/2 c Sugar
2 T Ener-G Egg Replacer *
4 T Soymilk or Water
1 T Orange or Lemon Zest
1 T Vanilla Extract
2 c All-Purpose Flour, sifted or Pastry Flour
1 t Baking Powder
1 t Baking Soda
2/3 c Orange or Lemon Juice (you can also do a combination of the two)

Glaze
1/2 c Confectioners' Sugar
2 1/2 t Orange or Lemon Juice

Preheat oven to 350° F. Grease 9-10 in pan (you can use a tube pan or a spring form pan)

Prepare the Streusel in a medium bowl . Mix together brown sugar, almonds and flour. stir in the soy butter and zest. Set aside.

In a large bowl , using an electric mixer, beat together on medium speed butter & sugar until fluffy. Add Ener-G egg replacer and Soymilk or water, beat until well mixed. Beat in Vanilla and Zest.

In a large bowl mix together flour, baking powder & baking soda.

Reduce mixer speed to low. Alternately beat flour mixture and juice into egg mixture, beginning and ending with flour.

Spoon half the batter into prepared pan. Sprinkle with half the streusel. Top with remaining batter and streusel.

Bake until toothpick inserted comes out clean. 30 to 35 minutes. Transfer to a wire rack and cool completely.

To prepare glaze, stir together confectioners sugar and juice until smooth.

Place cake on serving plate and drizzle with glaze.


This is a family favorite. I have made this cake many different ways. Sometimes I will use a tube pan but more often than not I use the spring form pan and instead of doing two layers I usually do a single layer and spread the streusel on the top. You could probably use less of the streusel doing it this way but I always use it all. I have made this for Breakfasts and for Dessert after special meals. This is a rich and delicious cake.

Serve with coffee or iced tea and you have a wonderful dessert for company.

*These items can also be purchased at your local health food stores

I hope you all enjoy!
DanicaA

Monday, January 2, 2012

Cindy's November Craft Camp Project 2

Here is the second project I demo'd at Cindy's Nov 13 Craft Camp. I am finally taking the time to blog this craft camp's projects. I need to get this done now as I am already working on ideas for January's Craft Camp .

Again I am using the Serene Snowflakes stamp set. This is still my favorite stamp set.....Maybe I need to start playing with other stamps. I may find I like them just as well.

This is another card cased from Stampin' Connection. This card is by Julie Leblanc 
I had a number of supplies left over so I put them all together and will either save them for the bazaar our local museum has yearly or see if I can sell them in a local boutique.
I love the color combo Island Indigo, Pool Party and Very Vanilla.
 I used two different stamps from two different sets for the Season's Greetings saying. I used Curly Cute and Many Merry Messages. The inside saying is also from Many Merry Messages.
As you can see, I have packaged the cards up and added a small piece of paper with the inside greeting stamped on it and slipped inside. I have also included coordinating envelopes, that I stamped with matching stamp and colors.

I hope you all enjoy.
DanicaA

Project Recipe: Island Indigo and Very Vanilla Cardstock, Island Indigo and Pool Party Classic stamp pads, Serene Snowflakes Stamp Set, Curly Cute Stamp Set, Many Merry Messages Stamp Set, Island Indigo 3/8" Ruffled Ribbon, Basic Rhinestones and Very Vanilla medium envelopes

Sunday, January 1, 2012

Happy New Year!!!

Happy New Year!!!
 I have all kinds of plans and goals for the new year.

 Many of you probably do the same each year....you sit down and write out goals and plans and stick to them for a week maybe two maybe even for a month or longer and then they fall by the wayside. I know that I usually have this problem, so my first and foremost goal for the year is to keep all my goals and plans all year long.We will see how I do as Blogging daily is a goal I have. I am trying to think of ways to make sure I stick to this goal, one way will be to schedule posts, and maybe choose days of the weeks for similar postings.... Hmm.....We will see!

I hope that you all have a wonderful and productive 2012. May dreams come true and hopes be realized.
God Bless!
DanicaA